




I try to post consistently on LinkedIn, but I confess that it’s not always top of my list when deadlines are looming, my toddler’s kept me up at night, and I simply can’t justify yet another cup of coffee to keep me going.
We all have those days, which is why it’s so helpful to batch your LinkedIn content creation and schedule your LinkedIn posts ahead of time.
According to Buffer’s latest data, LinkedIn is now the strongest platform for organic engagement, with a median rate of 8%. This shows us that success on the platform isn’t about going viral once, but about building steady, predictable engagement over time.
So, if you have thought leadership to share (and I’m willing to bet you do), staying consistent by scheduling your posts on LinkedIn is a massive opportunity to reach more people and build a credible reputation out in the professional world.
In this guide, I’ll walk you through two simple ways to schedule your LinkedIn posts on your company page and/or personal profile.
Key takeaways
- Two methods: You can schedule posts natively within LinkedIn or use a third-party tool like Buffer for more features and flexibility.
- Consistency is key: Regular posting can lead to over 5x more engagement.
- Native limits: LinkedIn’s built-in scheduler allows planning up to three months in advance, but not groups and events.
- Optimal timing: Aim for weekdays between 4 p.m. and 8 p.m., specifically Wednesdays and Fridays.
LinkedIn company page vs. personal LinkedIn profile
What’s the difference between a personal page and a company page on LinkedIn? Your personal profile is all about you: your skills, experience, and voice. It’s where you connect, build relationships, and share thought leadership in a more personal, authentic way.
A company page represents a business. It’s where companies showcase their brand, post updates, and build credibility at an organizational level.
Which type of LinkedIn profile should you use?
If you run a business and have the time and capacity to dedicate to a company page and your personal profile, you would ideally do both.
If not, I recommend starting with your personal profile — people connect with people first. Then, support your efforts with a company page to establish your brand and give your audience a place to learn more about your business. Of course, this depends on your content strategy and goals. In my case, since I’m a freelancer and essentially the whole brand myself, I focus on my personal profile.
How to schedule a post on LinkedIn
You can schedule posts on LinkedIn using the built-in scheduling feature on both desktop and mobile devices. The steps to schedule a post natively on LinkedIn are the same for a personal profile and a company page. The only difference is where you start.
For a personal profile, you’ll simply start from the LinkedIn homepage. For a company page, there’s an extra step — making sure you choose your company page from the dropdown in the composer. From there, the scheduling steps are identical.
How to schedule a LinkedIn post from a personal profile
- Start a post as you normally would from the LinkedIn homepage.
- Instead of hitting Post, click on the little clock icon.
- You’ll be taken to a pop-up window where you can set the date and time you’d like your post to go live.
- Hit Next, then the Schedule button.
On mobile, the process is really similar: tap Post in the navigation bar, write your content, then tap the clock icon in the upper-right corner to pick your date and time. Tap Next, then Schedule.
How to schedule a LinkedIn post from a company page
There’s one thing you’ll need to do slightly differently here:
- Start a post as you normally would from the LinkedIn homepage.
- Click on the drop-down arrow next to your name to change to your company page.
- Select the page you want to post from.
- Instead of hitting Post, click on the little clock icon.
- You’ll be taken to a pop-up window where you can set the date and time you’d like your post to go live.
- Hit Next, then the Schedule button.
Easy peasy. Just note that there are a few limitations to be aware of:
- Time horizon: If you’re Type-A about planning your content in advance (and part superhero), you might be disappointed to learn you can only use LinkedIn’s built-in scheduling tool to publish posts between 10 minutes and three months in advance.
- Restricted formats: You can’t natively schedule posts for LinkedIn groups, events, jobs, or services. If you’re scheduling for a company page, there are a few extra restrictions: polls, reshares, and multiple-photo posts can’t be scheduled either.
Where do I see my scheduled LinkedIn posts?
Finding scheduled posts on LinkedIn isn’t super intuitive, and I remember having to Google how to do it a while back. (Maybe you did, and that’s how you landed here. Hi! 👋)
Here’s how to go about it:
- Start a post.
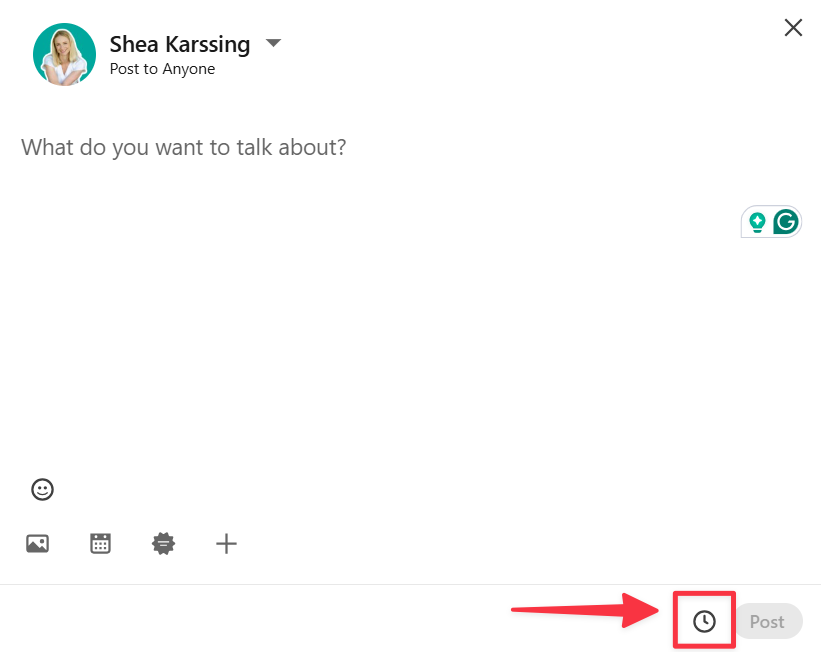
- Click on the little clock icon to go to the scheduled posts section.
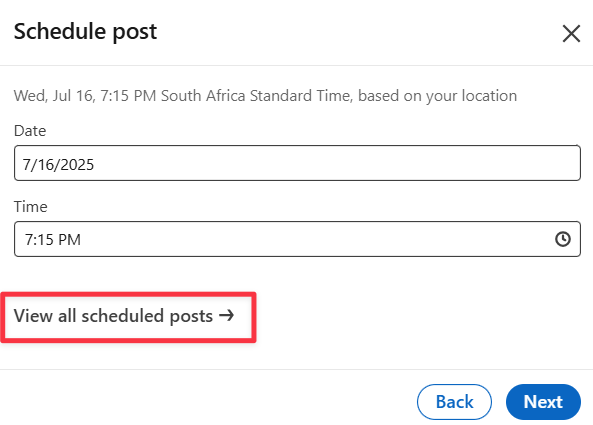
- Click on View all scheduled posts → to see what you’ve got in the pipeline.
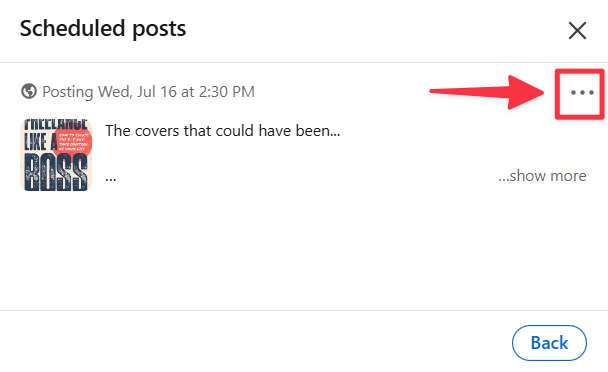
⚡
Pro tip: This section is also where you can reschedule, delete, or edit scheduled posts. Click the More icon (three dots) next to the post you want to update, then choose Modify schedule or Edit post.
How to schedule LinkedIn posts using Buffer as a scheduling tool
If you’re managing LinkedIn alongside other social channels — or you just want more flexibility with your scheduling — a tool like Buffer can simplify the process. Here’s how to schedule LinkedIn posts in just a few clicks:
- Head to your Buffer Channels area to connect your LinkedIn Page or profile (or both).
- Once your LinkedIn channel is connected, you can go ahead and click the green + New button on the top left of your Buffer dashboard.
- Create your post and select the channels you’d like to publish to.
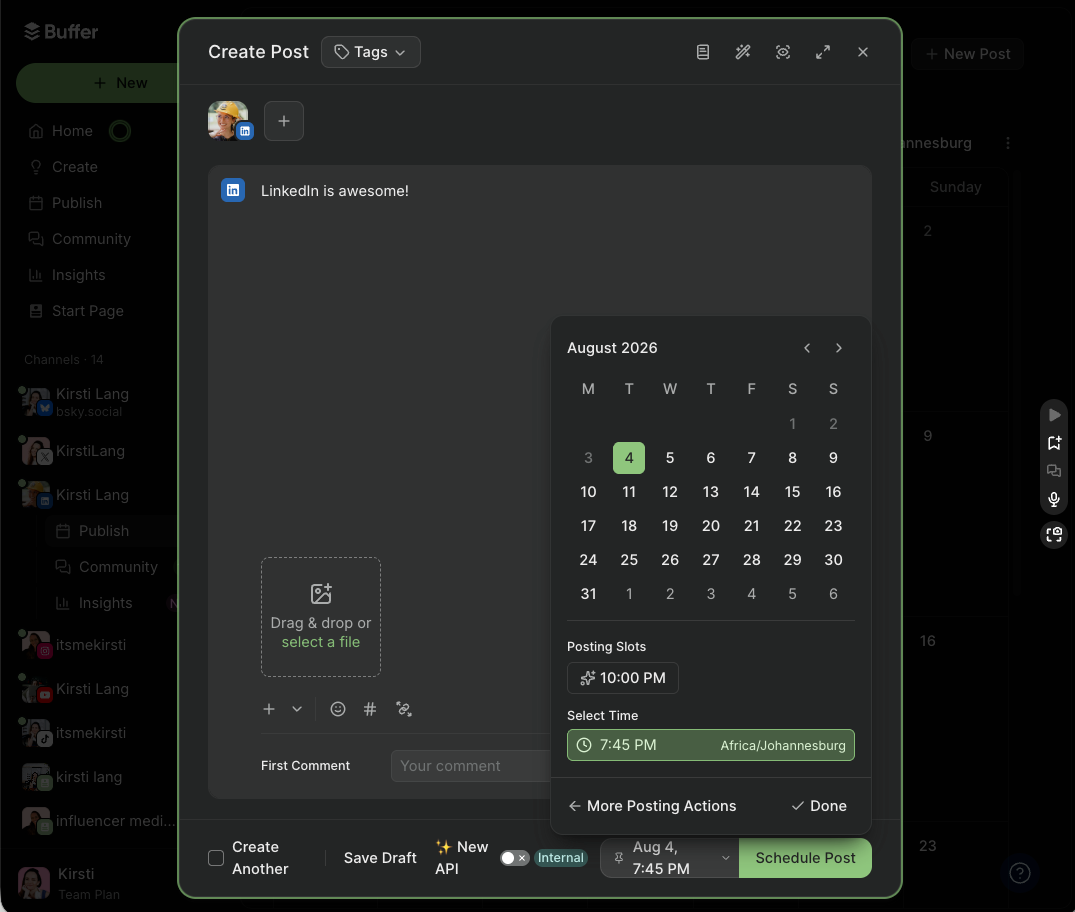
- Click the down arrow next to Schedule Post, and choose the best option for you: ‘Next available,’ ‘Now,’ or ‘Set Date and Time.’
You’re all set! This process applies to both LinkedIn Pages and personal profiles.
⚡
Pro tip: Use Buffer’s AI Assistant if you need some help creating or polishing your post. Include key points, your target audience, and your desired outcome in your prompt.
What kind of posts can I schedule on LinkedIn?
Whether you’re scheduling natively or through Buffer, you can schedule LinkedIn posts in these formats: text-only, image, GIF, PDF carousel, video, and link previews.
A few formats can’t be scheduled on LinkedIn, though: events, jobs, services, and group posts. If you’re posting from a company page, polls, reshares, and multi-photo posts are also off the table for scheduling.
How do I mention other LinkedIn Pages and profiles?
- To mention a Page: Copy and paste the specific LinkedIn Page URL (e.g.,
https://www.linkedin.com/company/bufferapp/) directly into the composer. - To mention a Profile: Type the @ symbol and search for the individual’s name to tag them.
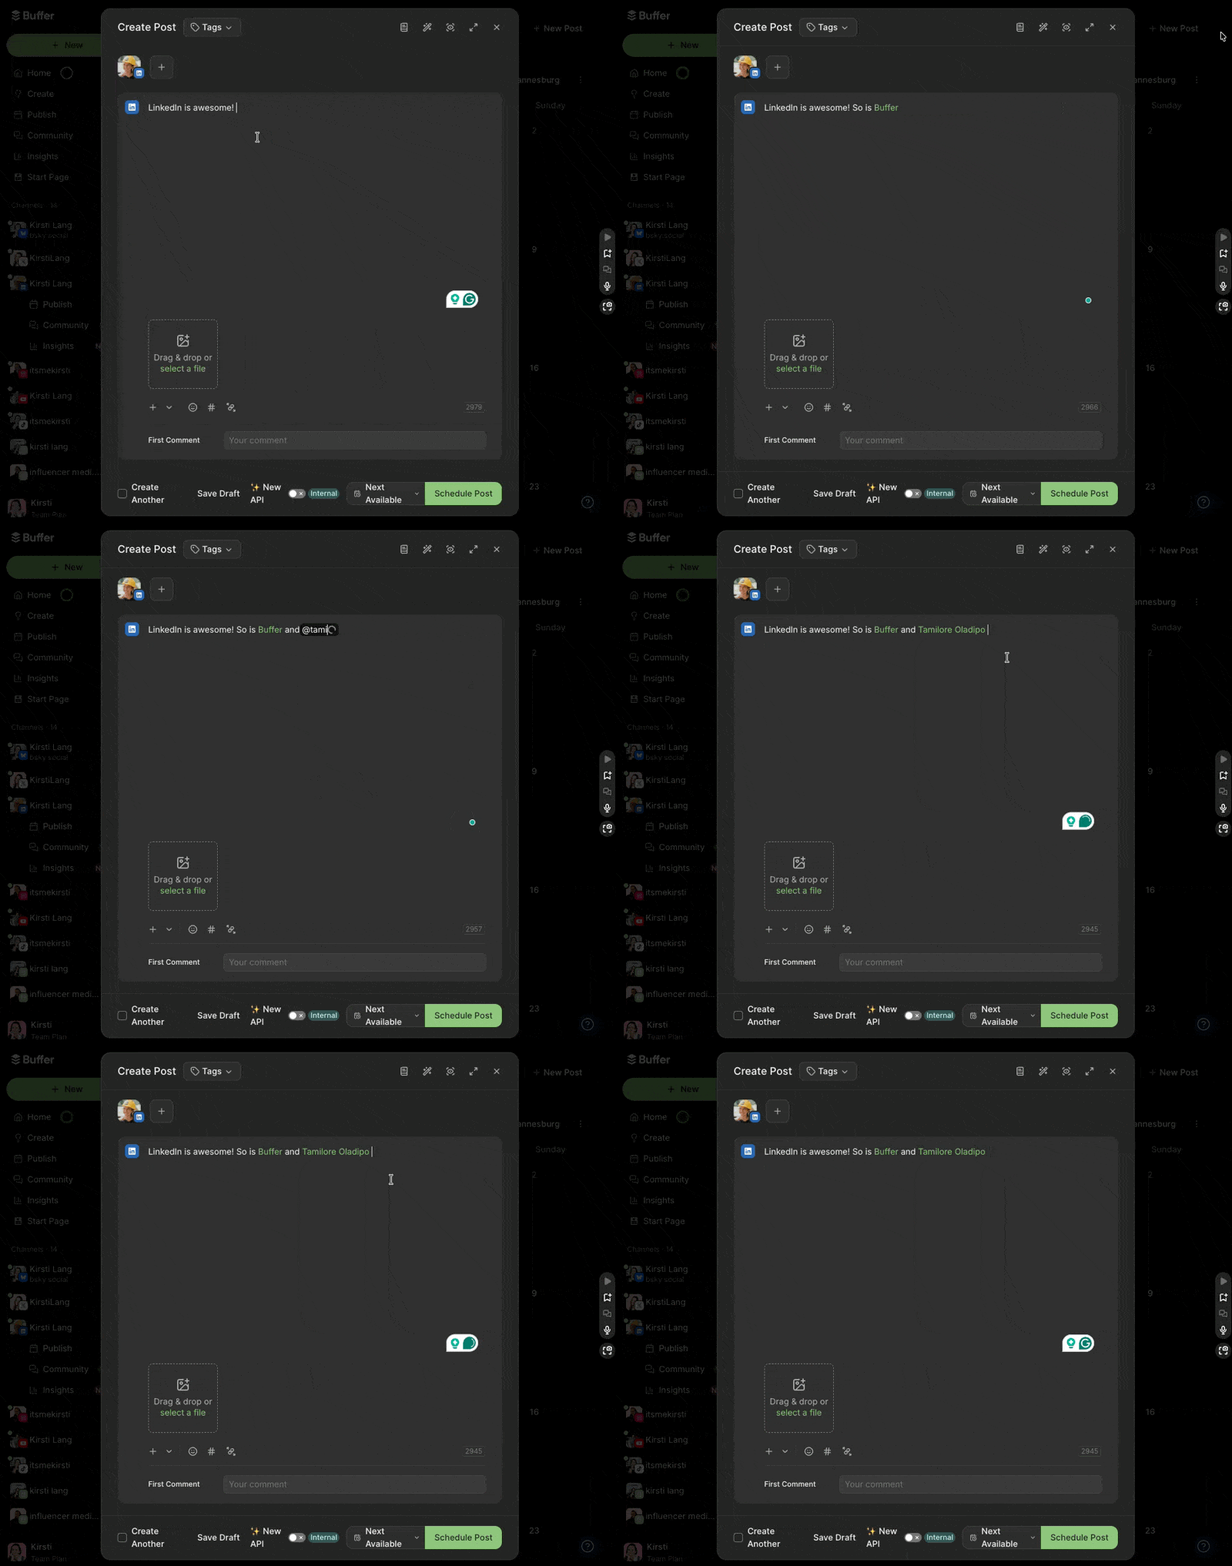
You can learn more about LinkedIn tagging here.
Scheduling LinkedIn posts on Buffer vs. LinkedIn at a glance
Why you should schedule your LinkedIn posts
- Reach more people: Post when your audience is most active to get more eyes on your content and boost engagement.
- Grow faster: Pages that post weekly see 5.6x more follower growth. For pages and individuals, showing up regularly signals relevance to both your audience and the LinkedIn algorithm.
- Save time and stress: Plan your LinkedIn posts ahead so you’re not scrambling to come up with something last minute.
- Work smarter: Batch-create posts to keep showing up and maintaining a professional presence, without cutting into your personal time.
- Stay on-brand: Align your LinkedIn posts with your bigger goals so you have more control over how you show up online.
Scheduling on LinkedIn works
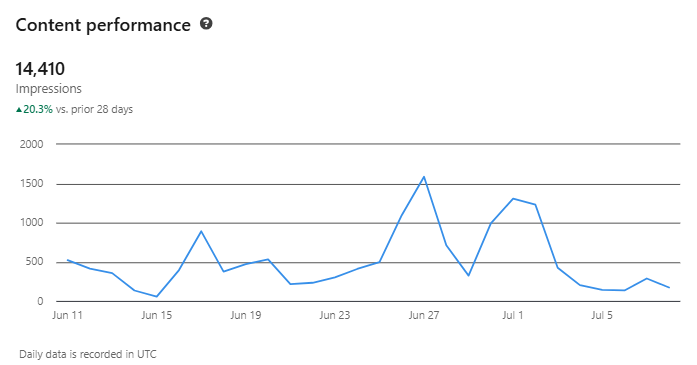
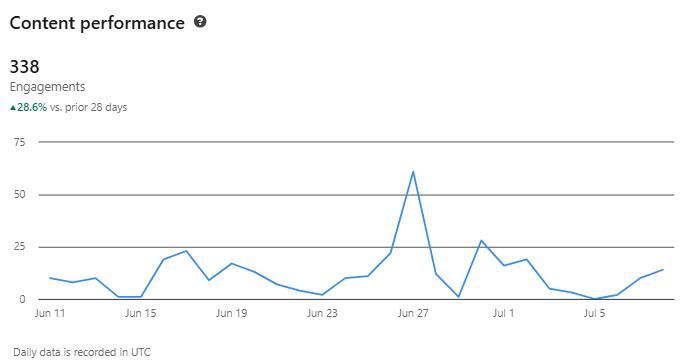
I’ve been taking part in Buffer’s Creator Camp, which started on 16 June. I scheduled my posts in advance so that I could be more consistent, which resulted in 20% more impressions and 28% more engagement than the previous 28-day period.
Quick tips for scheduling LinkedIn posts
Try new content formats
LinkedIn has evolved well beyond text-heavy posts — and there’s never been a better time to experiment with new formats. Video posts are having a moment on LinkedIn, and it’s worth leaning in — even if the idea of hitting record feels a little daunting at first.
If you’re a bit hesitant like me, don’t worry, you don’t have to stand in front of your camera and deliver a TED Talk. Try a simple voiceover, a quick behind-the-scenes clip, or a little day-in-the-life montage. Even a peek at your chaotic desk can be oddly interesting (and relatable).
I loved this idea from my creative colleague, Kirsti Lang (bonus productivity hack too):
Be relevant; be you
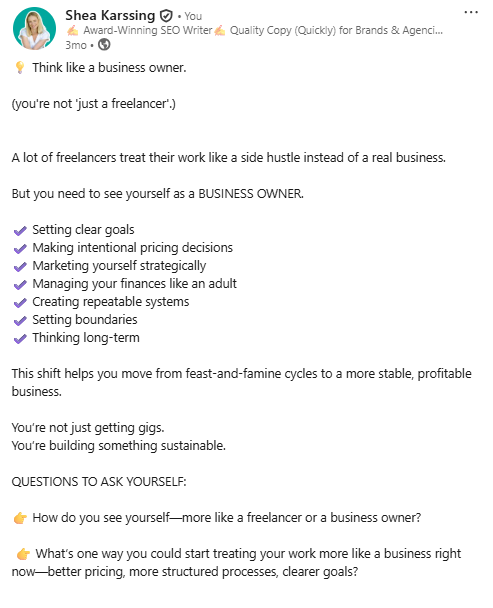
People come to LinkedIn to learn something new or get inspired — and the algorithm knows it. LinkedIn posts that are helpful, insightful, or just genuinely useful tend to do better. Share what you know, keep it authentic, and the algorithm will reward you.
As an example, this post of mine did pretty well because I think it hit a nerve (and hopefully helped) my fellow freelancers:
Find a system that works for you
Consistency beats perfection. If you’re always forgetting to post (we’ve been there), a scheduling tool like Buffer is your best friend. You can plan your posts when you’re feeling creative and let them go out while you’re filming yourself in max productivity mode à la Kirsti.
Don’t burn yourself out
If posting five times a week makes you dread LinkedIn, you won’t stick with it. Pick a pace you can actually keep up with. Once a week is better than burning out and ghosting your audience for months.
Keep an eye on what’s working
Not every post will be a hit, and that’s fine. But take a peek at your LinkedIn stats (or Buffer’s Insights) to see what’s landing well. Tweak, test, repeat.
Time it right
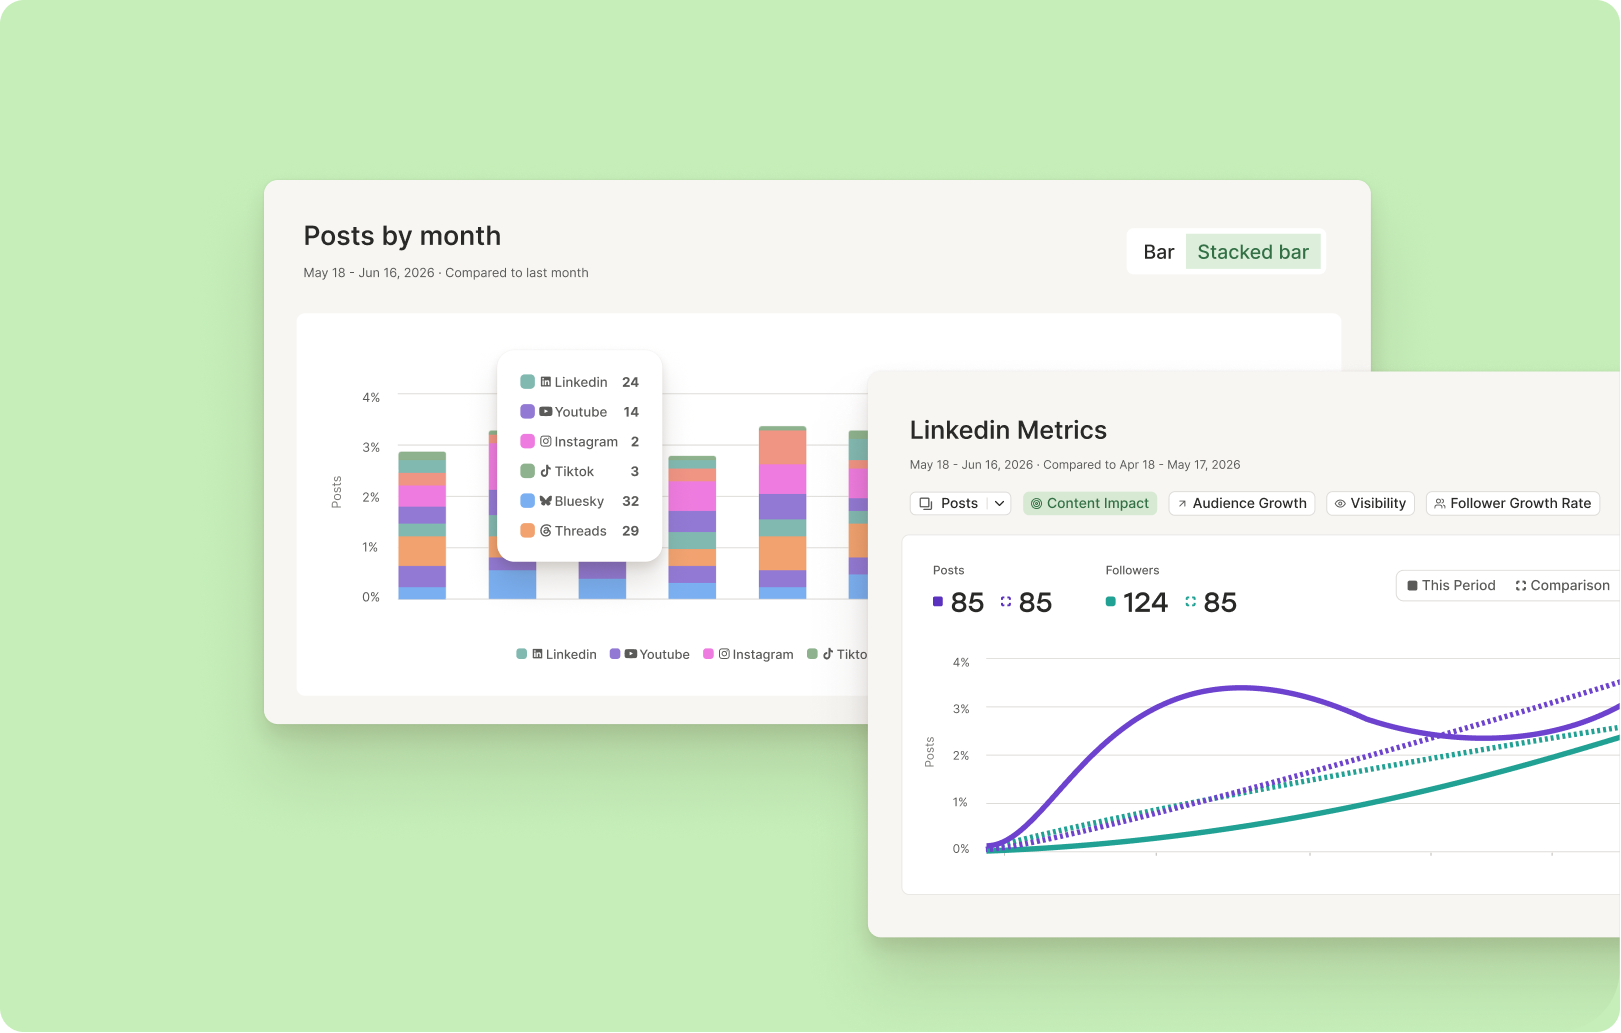
LinkedIn loves a weekday scroll. Generally, 3 p.m. to 8 p.m. on weekdays is prime time to post on LinkedIn, with a sweet spot around 4 p.m. on Wednesday and at 3 p.m. and 4 p.m. on Friday.
But don’t sweat the exact minute. Aim for when your audience is likely to be online and engaged — not late at night when attention is low.
Get scheduling
LinkedIn is one of the best places right now to share what you know, connect with the right people, and build a reputation that actually opens doors.
However, consistently sharing and showing up on LinkedIn doesn’t have to mean posting in a rush between meetings or scratching your head for something insightful at the last minute.
With a little planning and the right tools, you can batch your content, schedule posts for peak times, and focus your energy on creating work your audience actually values.
If you’re ready to make LinkedIn feel a little easier, you can start scheduling your posts with Buffer today. It’s free to get started — no trial, no catch — and a great way to build momentum and trust over time. It’s working for me, and I encourage you to give it a shot. Sign up for free, connect your LinkedIn channel, and start scheduling immediately.
More LinkedIn resources
FAQ on scheduling LinkedIn posts
Is there a way to schedule a LinkedIn post?
Yes, you can schedule posts directly on LinkedIn or use third-party tools like Buffer to plan and publish posts ahead of time (plus manage all your other channels in one place).
Can I schedule LinkedIn posts for free?
Yes. LinkedIn’s native scheduler is free to use. With Buffer’s Free plan, you can also schedule up to 10 LinkedIn posts at a time.
Why won’t LinkedIn let me schedule posts?
If you’re not seeing the scheduling option, it’s likely because you’re trying to schedule a post type that LinkedIn doesn’t support for scheduling — such as events, jobs, services, or group posts. For company pages, polls, reshares, and multi-photo posts are also unsupported.
When this happens, LinkedIn will show an error message letting you know. You have two options: remove the unsupported content from the post, or clear the scheduled date and time and post it immediately instead.
Do scheduled posts on LinkedIn get less engagement?
There’s no evidence that scheduling LinkedIn posts hurts your reach or engagement. Good content is good content — whether you post it now or later. Just focus on creating something valuable for your audience.
Can you schedule LinkedIn posts in advance?
Yes — LinkedIn’s native tool lets you pick a date and time for a post to go live, up to three months in advance. With Buffer, you can schedule posts for LinkedIn and your other social channels, manage them in a queue, and even schedule a first comment to go out at the same time.
How do I edit scheduled LinkedIn posts?
If you used LinkedIn’s native tool, navigate to your scheduled posts list (open the post composer, click the clock icon, then View all scheduled posts). From there, click the More icon on the post you want to update and choose Edit post or Modify schedule.
If you used Buffer, head to your Queue, click on the post you want to tweak, make your changes, and hit Save.
Can you schedule LinkedIn posts on mobile?
Yes. LinkedIn’s native scheduler works on both desktop and mobile. Tap Post in the navigation bar, write your post, then tap the clock icon in the upper-right corner to set a date and time. You can schedule posts up to three months in advance — but keep in mind that events, jobs, and services posts can’t be scheduled natively on any device.
Why are my scheduled LinkedIn posts not going live?
A few things can cause this. If you used a third-party tool, your LinkedIn connection may have expired — reconnecting the account usually fixes it. Content that violates LinkedIn’s policies may also be blocked before it publishes. If you’re scheduling through LinkedIn’s native tool, double-check that your post type is supported (events, jobs, and services can’t be scheduled). If the problem persists, delete the scheduled post and reschedule it.
What is the 5-3-2 rule on LinkedIn?
The 5-3-2 rule is a simple content mix guideline: for every 10 posts you publish, five should share content from others in your industry, three should be your own original content, and two should be personal — something that shows the human behind the account. It’s a useful framework for keeping your feed varied and your audience engaged without burning out on original content creation. When you’re batch-scheduling posts in advance, it’s a handy reference for building a balanced content calendar.